Project Norail (A gun customization system)
LOOP
LOOP is a sci-fi shooter set aboard a massive space train. Players take on the role of the protagonist fighting through car after car as the train is overrun by alien lifeforms. The game blends grounded ballistic weapons with Half-Life–inspired energy weapon design, using tight spatial layouts, system-driven enemy behaviors, and synergistic weapon mechanics to deliver fast-paced, high-intensity combat.
The visual style, performance targets, and asset pipeline are all built with the PC as the primary platform, involving extensive material optimization, PBR workflows, and real-time system testing.
Background Settings:
Loop is the capstone project of the University of Utah’s MEAE graduate program. I learned from the project as an outsource Technical Artist, using it as part of my Technical Art training with a focus on building production-ready weapon skin systems. Starting from a revolver concept created by the concept artist, Xiangyu Leo, I explored how to translate visual designs into a functional and customizable weapon pipeline.
The Plasma Pulse Gun is battery-powered, converting stored electrical energy into concentrated plasma bursts.

Concept Art by Xiangyu Leo (https://raint.artstation.com/)
Technical Challenge:
After getting the model from 3D artist Jinghan Lu, I focused on building a production-style weapon skin and VFX system. My work included diegetic UI integration, dynamic weapon generation, modular skin application, and Blueprint-based communication between systems. The goal was to practice creating scalable, game-ready Technical Art pipelines. One of the main challenges of this project lies in the weapon skin VFX system. For example, the bullet counter displayed on the diegetic UI screen uses a flipbook-based animation to update in real time. New weapons are generated through the weapon customization system and communicated back to the player character via a Blueprint Interface. In addition, different skin variants must be correctly applied to the weapon mesh, ensuring that materials, emissive details, and mesh overrides all function consistently across versions.

Model by Jinghan(Bronya) Lu (https://www.jinghanlu.com/)
Creating a Dynamic, Skinnable Weapon System


Weapons needed to:
-
Support multiple skin variants with different materials, emissives, and mesh parts.
-
Display real-time UI elements (e.g., bullet counters) directly on the weapon using diegetic screens.
-
Allow the game to generate new weapon instances from a weapon definition system.
-
Ensure all changes were correctly communicated back to the character through Blueprint Interfaces.
I structured weapons into three main components:
-
Weapon Definition Data
-
Weapon Actor (Blueprint Class)
-
Skin & Material Overrides
-
VFX + Diegetic UI Layer
Each component handled a specific responsibility and exchanged data through standardized interfaces.
Technical Solutions
1. Dynamic Materials/Flipbook Textures
The design required a real-time bullet counter placed directly on the weapon mesh instead of the HUD. This UI needed to be lightweight and responsive.
-
Implemented the bullet counter as a flipbook texture mapped to an emissive material.
-
Each frame in the flipbook corresponds to a digit (0–30).
-
When the weapon fires, the system updates ammo → switches the flipbook frame via material parameters.

2. Weapon Skin Variants
Weapon skins needed a clean and scalable way to support multiple cosmetic variations. Each skin could change materials, emissive patterns, mesh parts, and VFX behavior.
I implemented the skin system using a Blueprint Enum (SkinType Enum) to standardize and simplify the selection of weapon skins.
The improved system works as follows:
-
Enum controls the active skin (e.g., Default, Gold, Damaged, PlasmaEdition).
-
A Skin Configuration Table maps each Enum entry to:
-
Material overrides
-
Mesh overrides
-
Emissive patterns
-
VFX presets
-
-
When the Enum value changes, the weapon automatically:
-
Applies the correct material instance override
-
Loads mesh replacements if needed
-
Updates emissive mask and cosmetic parameters
-
Refreshes diegetic UI and weapon VFX states
-
3. UI-Driven Weapon Customization
The project required a UI-driven weapon customization flow where the player:
-
Generate a weapon customization room.
-
Uses a UI menu to choose weapon type, parts, and skins.
-
Sees the weapon assembled in front of them from multiple camera angles.
-
Confirms the selection, after which the final weapon is attached to the character’s skeleton socket and used in gameplay.
This demanded a clean data flow between:
-
UI Widgets
-
Weapon Assembly Blueprint
-
Character Blueprint
-
Weapon Actor
while keeping the system modular and easy to extend.

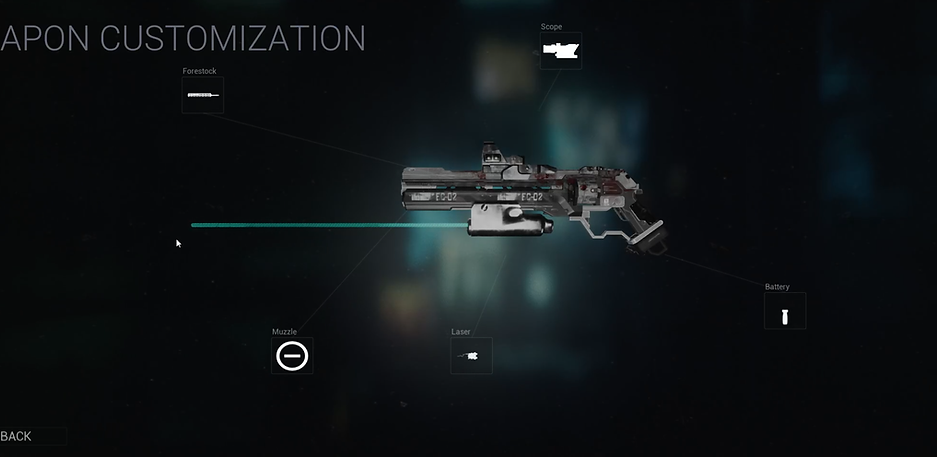

I treated the UI not just as a visual layer, but as a front-end for a data-driven weapon definition system. When the player interacts with a weapon—such as opening a new weapon crate or picking up a gun—in reality, a small “weapon customization room” is spawned far above or below the player, and the player is simply teleported to that space.
Although the weapon customization system appears to be just a panel popping up, it actually works like the character attribute interface. There are some camera set in different angles, and the new customized weapon will be created there based on player's selection.


1. Player Selects Options in the UI
-
The UI updates a WeaponConfig struct containing:
-
Weapon type
-
Skin enum
-
Mesh/attachment selections
-
-
When “Attachment Icon” is pressed, the UI sends this data to the Weapon Assembler Blueprint via a Blueprint Interface call.
2. Weapon Assembler Spawns & Builds the Weapon
-
The Assembler receives WeaponConfig.
-
It spawns a root weapon actor and attaches modular parts:
-
Barrels, scopes, batteries, etc.
-
-
Applies skins through the Enum-based skin system
-
Material overrides
-
Mesh overrides
-
Emissive/VFX presets
-
-
The assembled weapon is displayed in the customization room, with UI buttons switching between multiple camera angles.
3. Confirming the Weapon & Attaching to the Character
When the player closes the UI:
-
The UI sends the final WeaponConfig to the Character Blueprint.
-
The character:
-
Spawns the final weapon from the configuration
-
Attaches it to the character’s skeleton socket (RightHandWeaponSocket)
-
Stores the reference for firing, animation, and UI updates
-
The customization room is destoryed.
To Be Continued:
-
Add additional weapon skin types and expand overall customization options.
-
Remodel weapon attachment meshes as new designs are delivered by the concept art team.
-
Polish the UI, improving interaction flow, responsiveness, and visual clarity.
-
Implement breathing-light effects and screen display VFX for the weapon.
-
Set up weapon skeletons and socket hierarchies to ensure proper attachment points and integration.
-
Create inspection animations for the finalized weapon setup, showcasing assembled skins and attachments.