
NoRail (Joined as an Outsource Technical Artist)
Norail
A twisted train circles a dead sun—and you’re its only passenger. Scavenge what’s left at abandoned stations, fend off the twisted remnants of android servants, build the ultimate loadout, and uncover the truth behind an endless loop. Can you reach the front before it’s too late?
Game lLink:
https://store.steampowered.com/app/4125300/NoRail/
Team Members:
Mingyang Cai - Producer, Project Manager
Cleveland Parker-Producer, Narrative Designer, Voice Director
Noah Hart - Engineer, Level Designer, System Designer
Hairong "Roger" Luo - Engineer
Jiayang "Serina" Xu - Environment Artist, Technical Artist, 3D Artist
Ryan Andersen Technical Artist, Sound Designer, Composer
Peng He - Level Designer, VFX Artist
Dylan Bennett - VFX Artist, Technical Artist
Xiangyu "Ryan" Liu - Art Director, Concept Artist, 3D Artist
Aoyi "Erica" Chen - Character Artist, 3D Artist
Liyian Zhu - UI Artist, 3D Artist
Yukun Fang - Environment Artist, Technical Artist, 3D Artist
Zexuan Li - Engineer, Combat Designer
Anson Feng - Engineer
Yuguang "Richard" Shi - Lead Designer, System Designer, Combat Design
These are people who helped contribute to the project, though weren't placed on our capstone team:
Wei "William" Qin - Technical Artist
Bryan Boselli - Level Designer
Ziteng Zhao - 3D Artist
HsinWei"Wendy" Chou - 2D Artist, UI Artist)
Jinghan "Bronya" Lu - 3D Artist
Jiaqi Han- Technical Artist
James Boden - Dialogue Writer
Jeff Stratford - Narrative Consultant
And finally voice actors:
Raiden Dwight - Transit Supervisor
Yasmine Atkins - Train PA
Tom Glasmann - Train Station PA, AD Reader, RATs
Tony Trunnell - RATs, Audiolog
Avneet Kaur Sandhu - RATs, Audiolog
Rachel Johnson - Audiolog
Tyler Shaw - Audiolog
Cameron Measom - Audiolog
Jaycey Hartle - Audiolog
Kailey Gonzaga - Audiolog
Sylvi Schellong - Audiolog
Andy Luo - Audiolog
Victor Acosta - Audiolog
Judd Thorley - Audiolog
Ethan Rible - Audiolog
Game Overview:
Step aboard a space train looping a dead sun in the EXO 15 System. Stop at abandoned waystations for supplies to build the perfect loadout. Fail to reach the front in time, and a great being will send you back to the beginning—loop after loop.
You’ll step into the role of the sole human operator on the train, tasked with caring for a shipment of Robotic Assisted Technology Servants (RATS). But whatever destroyed this solar system is spreading through them—and through the train itself. As the RATS turn hostile and the cars warp beyond recognition, you’ll have to fight, adapt, and uncover the truth behind the cataclysm that left EXO-15 in ruin.
Each run will take you closer to the front- and whatever might be there.

My Work:
Norail is the capstone project of the University of Utah’s MEAE graduate program. I learned from the project as an outsource Technical Artist, using it as part of my Technical Art training with a focus on building PCG tools and production-ready weapon skin systems (which is not applied in the end due to limited time).
.png)
Houdini + UE PCG Tools
Procedural Stairs
The level contains multiple traversal systems and requires a large number of stair assets with accurate collision. To ensure consistent stair proportions, structural validity, and reliable gameplay collision during generation, I developed a procedural stair tool for this project to improve both asset production and level-design efficiency.
Based on the material direction provided by the art director, I created a new trim sheet and built the corresponding UV unwrapping setup in Houdini, ensuring that the procedural asset’s generated UV layout automatically aligns with the correct trim sheet regions.


Technical Experiments
During development, I evaluated the Houdini MCP workflow and used the Unreal Engine MCP integration for debugging and iteration.


Claude demonstrated a strong understanding of each encapsulated node’s parameters and UI panels, enabling efficient VEX code generation and debugging.

These are the in-game asset deployment scenarios.
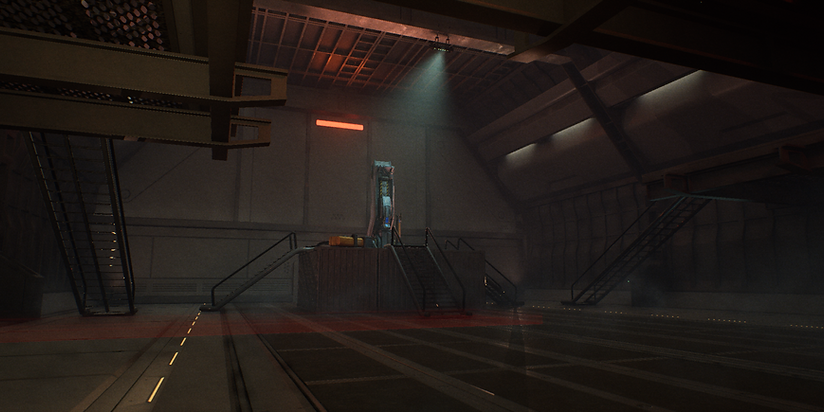

Procedural Railings:
This railing tool is a procedural asset tool I made for Norail.
Houdini HDA Model Data Processing Techniques
● Embedded Assets:
Referenced base FBX meshes are embedded directly inside the HDA as Extra Files and accessed via opdef: paths. This ensures the HDA is fully self-contained and prevents missing asset issues when used in Unreal Engine.
● Instanced Mesh Batching:
Meshes that do not require non-uniform deformation are processed through instancing. The HDA generates point data and directly references existing UE assets, enabling efficient draw call batching and improved runtime performance.
● Separate Baking for Deformed Meshes:
Meshes that require geometric deformation (e.g., rounded rail corners generated via Houdini’s Chain node for vertex-level deformation) are baked as unique geometry. In these cases, the HDA outputs finalized mesh data instead of using instanced references.
● Runtime Collision Generation:
Dedicated collision geometry is created within the HDA using groups or packed primitives named collision_geo, rendered_collision_geo, etc. Houdini Engine automatically detects and assigns these as collision meshes in Unreal Engine.
●Trim-sheet-based Texturing and UV Layout
Trim-sheet textures were used for material creation, with procedural UV layouts generated directly inside the HDA. The UVs were arranged to sample different regions of the same texture sheet efficiently. An emissive color channel was also used to create a breathing light effect, improving texture reuse and material flexibility.


Building World with LLM:
I also focused on testing the integration workflow between UE5 Scriptable Tool and Claude LLM on the project’s railing asset, with the goal of validating the full pipeline from natural language input to Houdini HDA parameter generation, write-back, and Cook.
User input is processed through Claude to modify procedural asset parameters.
This workflow integrates the Anthropic Claude API into a UE5 Scriptable Tool, allowing users to automatically adjust Houdini Digital Asset (HDA) railing parameters through natural-language descriptions.
The main workflow currently being tested is:
Prompt → LLM → JSON → Disk → UE Read → HDA Cook
Flow Description:
The user first defines the railing generation boundary in UE through either a spline tool or a bounding box tool. After clicking Cook, the Scriptable Tool calls the Houdini HDA to generate the initial railing. When the user enters a natural language request and clicks AICook, UE launches the external Python bridge script railing_bridge.py. The script reads the system prompt and API key, calls Claude through the Anthropic API, parses the returned JSON, validates and clamps the parameters, and writes railing_output.json back to disk. UE then reads this JSON file, writes the values into the HDA’s exposed parameters, and triggers ForceCook to update the railing result.
The complete runtime data flow is currently as follows:
User input description → Ask Claude button
→ Blueprint Execute Python Command #1 (write description to txt file)
→ Blueprint Execute Python Command #2 (execute ue_railing_auto.py)
→ subprocess calls system Python 3.12 (railing_bridge.py)
→ read .env (API Key) and railing_system_prompt.txt
→ call Anthropic Messages API (claude-sonnet-4) over HTTPS
→ parse JSON + validate/clamp parameters → write railing_output.json
→ read JSON → find HDA Actor → write parameters via Houdini Public API → Recook
→ HDA updates → output Instance Mesh / Static Mesh / Collision Geo


UE5 Scriptable Tool BlueprintInteractive tools were built inside UE for testing, mainly including:
A curve drawing toolA five-point bounding box generation tool (used to calculate the maximum and minimum boundaries)

A custom AICook event Used to connect to Call Force AICook
which is further encapsulated as a function for calls from the UI Widget Blueprint

Two Execute Python Command nodes:
The first writes the user’s natural-language description to txt
The second executes ue_railing_auto.py
A Bind Event to Force AICook node Used to bind the AICook button event which enables AI-driven parameter generation directly from the tool panel:


railing_bridge.py
This script connects UE and Claude, and is responsible for:Reading the system promptCalling the Claude APIParsing the returned JSONClamping parameter values to valid rangesOutputting jsonThe script is generated by Claude itself.

railing_system_prompt.txt
This file constrains Claude to output JSON in a fixed format, ensuring that field names remain consistent with the project’s parameter standards.

ue_railing_auto.py
Responsible for the second half of the AI Cook pipeline:
①Calling system Python via subprocess to execute railing_bridge.py, which invokes the Anthropic API
②Reading the generated railing_output.json
③Finding the target HDA Actor in the scene, prioritizing the selected actor, then the most recently created one
④Writing seven parameters into the HDA through Houdini Public API Asset Wrapper from the Houdini Public API
⑤Triggering the HDA recook

Meanwhile, ue_railing_auto.py was completed, enabling the full workflow from a Blueprint button click to Claude-based parameter generation and automatic HDA update.
Its main responsibilities include:
-
Calling py through subprocess using the system Python environment
-
Reading json
-
Writing values into the HDA through Houdini Public API’s HoudiniPublicAPIAssetWrapper
-
Triggering a Recook
The script currently supports two typical use cases:
-
Scenario A: First-time generation Select a Spline
-
Click Cook to instantiate the HDA
-
Click Ask Claude to write LLM-generated parameters
-
-
Scenario B: Editing an existing HDA Select an existing HDA Actor
-
Click Ask Claude to overwrite parameters directly and Recook
-
For HDA Actor lookup, the script prioritizes the HDA currently selected by the user. If no HDA is selected, it sorts instances by their name suffix index and retrieves the latest one.
I further completed the full closed-loop workflow of UI input → Claude API parameter generation → automatic HDA update.
The Tool In UE5.6 Works Like:


The demo is here: https://youtu.be/8vNTraajOa4(DemoYoutube)
Advantages of AI-assisted parameter editing:
① Reduced cognitive load:Users do not need to read parameter documentation or manually tune values based on design intent. Instead, they can focus directly on the design goal.
② Intelligent handling of parameter dependencies:Parameter rules and value constraints are defined in the System Prompt, allowing the LLM to apply them during reasoning without manually building branching logic inside the HDA. This reduces the cost of Switch nodes, enum controls, and string-array management.For example, when the bevel offset is 0.5, the LLM automatically selects a smaller model_width and a simpler railing style without support bars. When the offset is 1.5, it selects a larger model size and a more complex supported railing style.
③ Spatial reasoning and domain knowledge:The AI can reference internal knowledge bases for scenarios such as biome simulation and scatter-distribution logic. For randomness and density simulation, this approach can offer greater flexibility and potentially better performance than fully hand-authored HDA algorithms.
A gun customization system
Background Settings:
Starting from a revolver concept created by the concept artist, Xiangyu Leo, I explored how to translate visual designs into a functional and customizable weapon pipeline.
The Plasma Pulse Gun is battery-powered, converting stored electrical energy into concentrated plasma bursts.

Concept Art by Xiangyu Leo (https://raint.artstation.com/)
Technical Challenge:
After getting the model from 3D artist Jinghan Lu, I focused on building a production-style weapon skin and VFX system. My work included diegetic UI integration, dynamic weapon generation, modular skin application, and Blueprint-based communication between systems. The goal was to practice creating scalable, game-ready Technical Art pipelines. One of the main challenges of this project lies in the weapon skin VFX system. For example, the bullet counter displayed on the diegetic UI screen uses a flipbook-based animation to update in real time. New weapons are generated through the weapon customization system and communicated back to the player character via a Blueprint Interface. In addition, different skin variants must be correctly applied to the weapon mesh, ensuring that materials, emissive details, and mesh overrides all function consistently across versions.

Model by Jinghan(Bronya) Lu (https://www.jinghanlu.com/)
Creating a Dynamic, Skinnable Weapon System


Weapons needed to:
-
Support multiple skin variants with different materials, emissives, and mesh parts.
-
Display real-time UI elements (e.g., bullet counters) directly on the weapon using diegetic screens.
-
Allow the game to generate new weapon instances from a weapon definition system.
-
Ensure all changes were correctly communicated back to the character through Blueprint Interfaces.
I structured weapons into three main components:
-
Weapon Definition Data
-
Weapon Actor (Blueprint Class)
-
Skin & Material Overrides
-
VFX + Diegetic UI Layer
Each component handled a specific responsibility and exchanged data through standardized interfaces.
Technical Solutions
1. Dynamic Materials/Flipbook Textures
The design required a real-time bullet counter placed directly on the weapon mesh instead of the HUD. This UI needed to be lightweight and responsive.
-
Implemented the bullet counter as a flipbook texture mapped to an emissive material.
-
Each frame in the flipbook corresponds to a digit (0–30).
-
When the weapon fires, the system updates ammo → switches the flipbook frame via material parameters.

2. Weapon Skin Variants
Weapon skins needed a clean and scalable way to support multiple cosmetic variations. Each skin could change materials, emissive patterns, mesh parts, and VFX behavior.
I implemented the skin system using a Blueprint Enum (SkinType Enum) to standardize and simplify the selection of weapon skins.
The improved system works as follows:
-
Enum controls the active skin (e.g., Default, Gold, Damaged, PlasmaEdition).
-
A Skin Configuration Table maps each Enum entry to:
-
Material overrides
-
Mesh overrides
-
Emissive patterns
-
VFX presets
-
-
When the Enum value changes, the weapon automatically:
-
Applies the correct material instance override
-
Loads mesh replacements if needed
-
Updates emissive mask and cosmetic parameters
-
Refreshes diegetic UI and weapon VFX states
-
3. UI-Driven Weapon Customization
The project required a UI-driven weapon customization flow where the player:
-
Generate a weapon customization room.
-
Uses a UI menu to choose weapon type, parts, and skins.
-
Sees the weapon assembled in front of them from multiple camera angles.
-
Confirms the selection, after which the final weapon is attached to the character’s skeleton socket and used in gameplay.
This demanded a clean data flow between:
-
UI Widgets
-
Weapon Assembly Blueprint
-
Character Blueprint
-
Weapon Actor
while keeping the system modular and easy to extend.

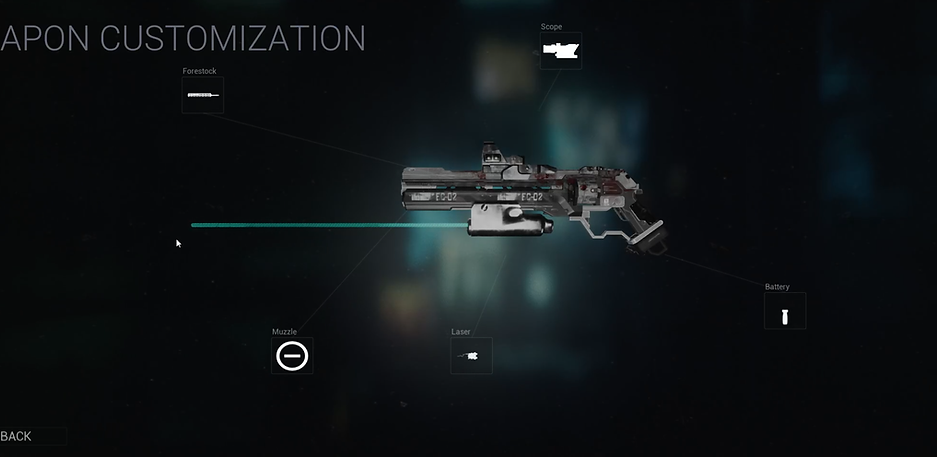

I treated the UI not just as a visual layer, but as a front-end for a data-driven weapon definition system. When the player interacts with a weapon—such as opening a new weapon crate or picking up a gun—in reality, a small “weapon customization room” is spawned far above or below the player, and the player is simply teleported to that space.
Although the weapon customization system appears to be just a panel popping up, it actually works like the character attribute interface. There are some camera set in different angles, and the new customized weapon will be created there based on player's selection.


1. Player Selects Options in the UI
-
The UI updates a WeaponConfig struct containing:
-
Weapon type
-
Skin enum
-
Mesh/attachment selections
-
-
When “Attachment Icon” is pressed, the UI sends this data to the Weapon Assembler Blueprint via a Blueprint Interface call.
2. Weapon Assembler Spawns & Builds the Weapon
-
The Assembler receives WeaponConfig.
-
It spawns a root weapon actor and attaches modular parts:
-
Barrels, scopes, batteries, etc.
-
-
Applies skins through the Enum-based skin system
-
Material overrides
-
Mesh overrides
-
Emissive/VFX presets
-
-
The assembled weapon is displayed in the customization room, with UI buttons switching between multiple camera angles.
3. Confirming the Weapon & Attaching to the Character
When the player closes the UI:
-
The UI sends the final WeaponConfig to the Character Blueprint.
-
The character:
-
Spawns the final weapon from the configuration
-
Attaches it to the character’s skeleton socket (RightHandWeaponSocket)
-
Stores the reference for firing, animation, and UI updates
-
The customization room is destoryed.
To Be Continued:
-
Add additional weapon skin types and expand overall customization options.
-
Remodel weapon attachment meshes as new designs are delivered by the concept art team.
-
Polish the UI, improving interaction flow, responsiveness, and visual clarity.
-
Implement breathing-light effects and screen display VFX for the weapon.
-
Set up weapon skeletons and socket hierarchies to ensure proper attachment points and integration.
-
Create inspection animations for the finalized weapon setup, showcasing assembled skins and attachments.